|
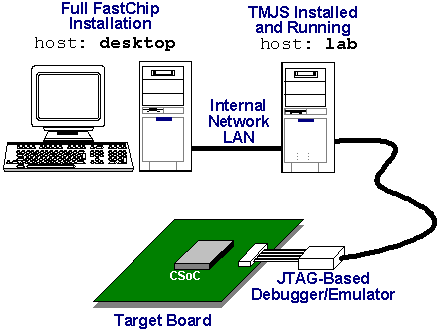
Can I Download and Debug via a Remote PC?
The Triscend development environment allows for efficient
and easy-to-use remote debugging. For example, you may be running FastChip
and your debugger from the desktop PC comfortably located at your desk. The
physical hardware may be at a remote location, such as the hardware
laboratory. In the lab, a separate computer connects to the target board via
a JTAG-based debugger emulator. As long as the two PCs are on the same
network and can communicate via TCP/IP, then you can remotely download and
debug the application from the comfort of your desktop PC.
Setting Up the Lab PC
Typically, lab PCs are old workstations working well
beyond their prime. They generally lack fancy displays and are notoriously
short on disk space and memory. Consequently, you probably do not want to
install all of FastChip on the lab PC. The critical requirement, however, is
the Triscend Multi-JTAG Sever (TMJS).
 Insert
the FastChip CD-ROM on the lab machine and start the FastChip installation
process. When you reach the Setup Type dialog box, select Custom installation.
Click Next >. Insert
the FastChip CD-ROM on the lab machine and start the FastChip installation
process. When you reach the Setup Type dialog box, select Custom installation.
Click Next >.

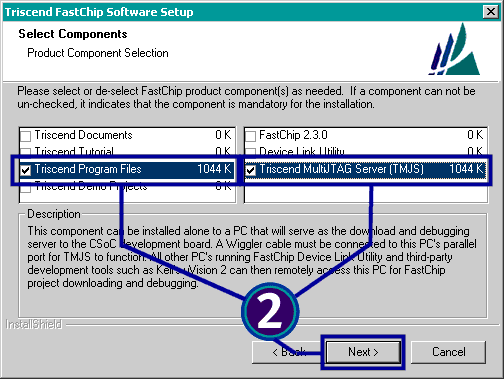
 De-select
all components except Triscend Program Files. De-select all programs
except Triscend MultiJTAG Server (TMJS). Click Next >. De-select
all components except Triscend Program Files. De-select all programs
except Triscend MultiJTAG Server (TMJS). Click Next >.
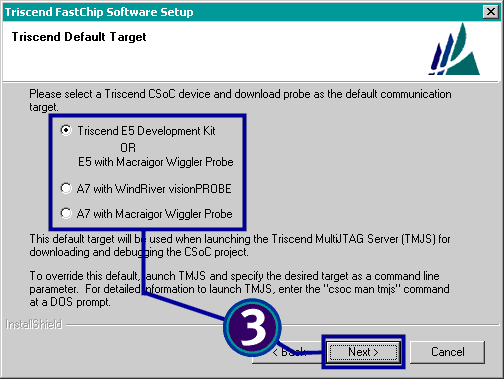
 Choose
the appropriate JTAG-based download probe for your development environment
and click Next > and complete the remaining installation steps. Choose
the appropriate JTAG-based download probe for your development environment
and click Next > and complete the remaining installation steps.
 Start
a TMJS session by opening a command console or DOS box and typing the
following command. Start
a TMJS session by opening a command console or DOS box and typing the
following command.
tmjs
 Check
that TMJS successfully launches with the message Status: Server is
running. In the example shown below, TMJS is communicating with the
Macraigor Wiggler JTAG cable via port 5005. Check
that TMJS successfully launches with the message Status: Server is
running. In the example shown below, TMJS is communicating with the
Macraigor Wiggler JTAG cable via port 5005.
|
TRISCEND MULTIJTAG SERVER COMMANDS
help : display Triscend
MultiJTAG Server help.
exit/quit : diconnect target,
terminate JTAG server & exit.
status : show JTAG server
connection status & settings.
connect : launch JTAG server &
connect to target.
terminate : disconnect target &
terminate JTAG server.
clear : clear target name &
host settings.
Launching JTAG server & connect
to target ‘TE5_JTAG_Wiggler’ on port 5005
Server is running.
Opening TCP/IP channel to JTAG server on port 5005
TCP/IP channel is open.
Status : Server is running.
Settings: TE5_Jtag_Wiggler, port 5005
tmjs<
|
Setting Up the Desktop PC
The other side of the connection is your desktop PC. The
following instructions assume that you have already installed FastChip and
your source-level debugger.
Configure FastChip Device Link (FDL)
Configure the communication settings for FastChip Device
Link (FDL).
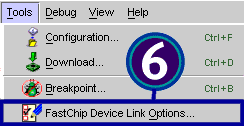
 From
the FDL menu, select Tools à
FastChip Device Link Options. From
the FDL menu, select Tools à
FastChip Device Link Options.
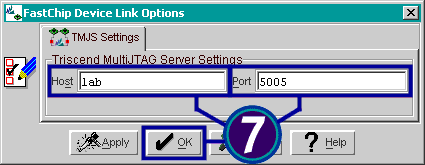
 Under
Host, enter the host name of the computer connected to the target board and
running the Triscend MultiJTAG Server (TMJS). In the example shown above,
the host name for the remote computer is lab.
Set Port to 5005, the
same settings used by the TMJS server. Click OK. Under
Host, enter the host name of the computer connected to the target board and
running the Triscend MultiJTAG Server (TMJS). In the example shown above,
the host name for the remote computer is lab.
Set Port to 5005, the
same settings used by the TMJS server. Click OK.
Configuring Your Debugger
The next step is to configure your debugger to communicate
with the remote host running TMJS. Two examples are shown here. Click the
hyperlinks below to jump to your debugger.
Keil µVision2 Debugger (dScope)
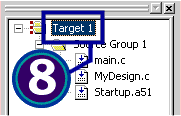
 Open
your Keil µVision2 project for a Triscend E5 CSoC application. In the
µVision2 hierarchy tree, click on the root object, usually called Target 1. Open
your Keil µVision2 project for a Triscend E5 CSoC application. In the
µVision2 hierarchy tree, click on the root object, usually called Target 1.
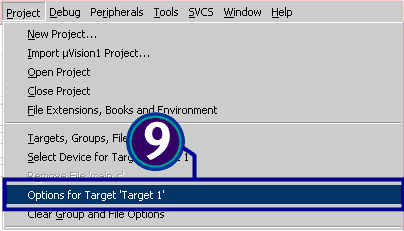
 From
the µVision2 menu, select Project à
Options for Target. From
the µVision2 menu, select Project à
Options for Target.
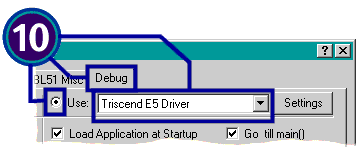
 Click
the Debug tab. Select Triscend E5 Driver to connect the
µVision2 debugger to a Triscend E5 design via the Macraigor JTAG cable or the
parallel port on the Triscend E5 Evaluation Board. Choose the Use
option to perform in-system debugging on the Triscend E5 via JTAG instead of
using µVision2’s instruction-set simulator. Click
the Debug tab. Select Triscend E5 Driver to connect the
µVision2 debugger to a Triscend E5 design via the Macraigor JTAG cable or the
parallel port on the Triscend E5 Evaluation Board. Choose the Use
option to perform in-system debugging on the Triscend E5 via JTAG instead of
using µVision2’s instruction-set simulator.
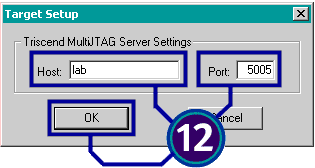
 Click
Settings. Click
Settings.
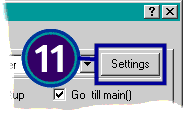
 Set
Host to the host name of the computer connected to the target board and
running the Triscend MultiJTAG Server (TMJS). In the example shown above,
the host name for the remote computer is lab.
Set Port to 5005, the
same settings used by the TMJS server. Click OK. Set
Host to the host name of the computer connected to the target board and
running the Triscend MultiJTAG Server (TMJS). In the example shown above,
the host name for the remote computer is lab.
Set Port to 5005, the
same settings used by the TMJS server. Click OK.
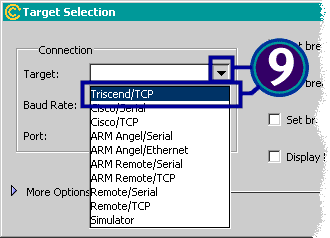
Invoke
the GDB debugger for the A7 family. From the GDB menu, select File à Target Settings.

Open
the Target droplist and select Triscend/TCP.
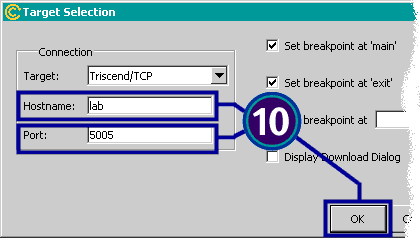
Set
Hostname to the host name of the computer connected to the target board and
running the Triscend MultiJTAG Server (TMJS). In the example shown above,
the host name for the remote computer is lab.
Set Port to 5005, the
same settings used by the TMJS server. Click OK.
|
FastChip Version: 2.3.0
This solution may or may not apply to other versions
of the FastChip development system.
|
 ® ®
©
2002 by Triscend Corporation. All
rights reserved.
|